


Cable and Tube Management ·
Organise Multiple Cables or PTFE Tubes with a Custom Radial Snap Holder
When several equal-size cables, PTFE tubes or pneumatic lines need to move together but remain individually removable, a radial snap holder is a compact alternative to a cable tie. This guide covers measuring, material choice and real applications.
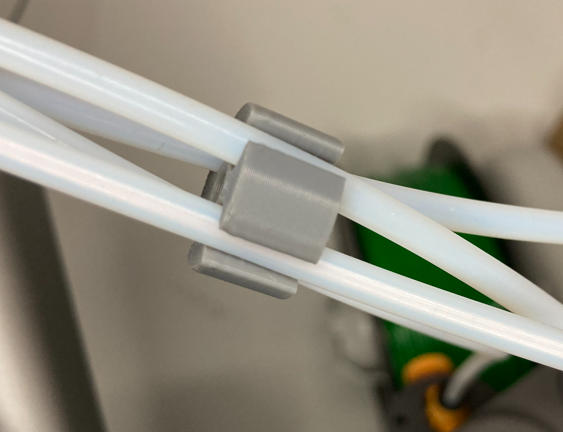
Four PTFE tubes run from a filament changer to a 3D printer. Several sensor cables need to move together on a small machine. Or a group of pneumatic tubes starts neatly at the valve block but separates every time the equipment is serviced. A cable tie can hold the bundle, but it may squeeze flexible lines and normally has to be cut whenever one line is replaced.
A radial cable and tube holder solves a slightly different problem. Several equal-size round lines are arranged around a compact centre. Each one snaps sideways through a narrowed entry into its own circular channel. The bundle stays organised while individual tubes or cables remain accessible.
The parametric model needs only three inputs: outside line diameter, number of lines and holder length. The resulting model can be downloaded as an STL or ordered as a finished 3D print. This guide explains where the design is useful, how to measure for it and where a different type of cable support is the safer choice.
How is a radial holder different from a cable tie or cable comb?
A cable tie pulls every line into one compressed bundle. A conventional cable comb usually keeps lines in a flat row. The radial holder places them around a central point instead, which creates a compact bundle that can follow a shared direction without using as much width.
Each line has its own round channel and snap opening. A single Bowden tube or sensor cable can be removed without cutting the holder or disconnecting every other line. This is helpful when a multi-material printer gains another tube or a machine cable needs to be replaced during maintenance.
It is not a universal cable clamp, however. The part travels with the line bundle and is not designed as a wall fixing. It is also not a certified strain relief, pressure-rated pneumatic connector, bend restrictor or substitute for an energy chain.
Practical applications
PTFE and Bowden tubes on a 3D printer
Multi-material systems and DIY filament changers often use four or more PTFE tubes in parallel. Without guidance, the tubes cross, catch on frame profiles or push unpredictably against the toolhead. Several radial holders placed along the run can turn them into one controlled bundle.
Movement still comes first. The holders must not strike the frame, enclosure or spool system, and the tubes must remain above their permitted minimum bend radius. A tidy bundle is only useful if it does not increase drag on the printhead.
Pneumatic tubes near a valve manifold
Equal-size pneumatic lines can be grouped between a valve manifold and a moving assembly. The holder keeps them ordered and makes the route easier to inspect. It does not form part of the pressure seal, though. Tube specification, fittings, pressure rating and abrasion protection must be checked independently.
Sensor wires in robotics and model engineering
Round sensor cables or jacketed control wires can be organised on a robot arm, test fixture or model. Where movement is continuous, check for rubbing between the lines and the printed channels. Never position the holder directly over a connector, crimp or delicate cable transition.
Workshop and electronics projects
Test leads, LED cables and small hoses can also be kept sorted on a temporary setup. If the bundle must be fixed to a wall, desk or machine plate, use a purpose-designed screw-mounted clip instead.
Configure a radial cable and tube holder
Enter the outside line diameter, channel count and holder length, then check the generated 3D preview.
Choosing the three parameters
1. Cable or tube diameter
Measure the outside diameter of the line. Do not close the calliper so firmly that a soft tube becomes oval. With printed markings, braided sleeves, seams or irregular insulation, measure in several places and use the thickest relevant section.
The nominal size printed on PTFE or pneumatic tubing is a useful starting point, but it does not replace a measurement. Manufacturing tolerances and printer calibration affect the final snap fit. Every channel in one generated holder uses the same line diameter. A mixed bundle containing one thick power cable and several thin sensor wires is therefore not a suitable use case.
2. Number of cables or tubes
The configurator accepts whole numbers from 1 to 12. It distributes the channels radially and calculates the pitch circle, outside size, wall sections, snap lips and central relief automatically.
Do not add many empty channels simply in case they are needed later. Unused positions make the part larger and may cause interference on a moving assembly. One spare channel can make sense where expansion is genuinely planned. For a frequently changing system, several smaller holders may be more flexible than one twelve-channel part.
3. Holder length
Holder length runs along the cables or tubes. A longer body guides the bundle over a greater distance and is less likely to twist. It also needs more straight line and becomes harder to move through a tight curve.
A short holder suits compact bundles and smaller bends. It should not be so short that there is too little contact area. The useful length therefore depends on line diameter, stiffness, movement and available space rather than on appearance alone.
How much clearance does a snap holder need?
Channel clearance and retaining lips are calculated automatically from the entered diameter. The real fit still depends on the printer, material, layer height and line surface. A tough PETG print behaves differently from a brittle PLA print; flexible silicone tube clips differently from rigid PTFE tubing.
For an important or large installation, print a short test holder first. Snap the line in and out several times, check that it stays in place and look for flattening or surface marks. Only then print the full quantity.
Planning holder positions along the route
- Inspect the whole route: mark moving areas, connectors, sharp edges and hot components.
- Measure every line: place only genuinely equal-size lines in one holder design.
- Respect bend radius: avoid placing a rigid holder in a tight curve or immediately next to a fitting.
- Test full movement: move the toolhead, carriage or robot slowly through its complete travel.
- Choose sensible spacing: use enough holders to stop crossing without making the bundle rigid.
- Plan maintenance access: orient the snap openings so each line can still be reached.
A perfectly straight bundle at rest does not prove that the routing works. The critical point is usually the worst operating position: maximum travel, tightest curve and closest approach to the frame or enclosure.
Which printing material works best?
- PLA prints easily and can be accurate. It may be sufficient for a prototype or static indoor bundle, but thin retaining lips can become brittle with repeated opening or lose shape at higher temperatures.
- PETG is a practical choice for many moving cable and tube bundles because it is generally tougher. The exact snap action still depends on print temperature, wall setup and the individual filament.
- ASA can help in warmer or UV-exposed locations, but it does not automatically approve the holder for outdoor machinery, vehicles or safety-critical equipment.
A flexible material is not automatically better. A very soft holder may fail to keep lines separated, while a hard brittle plastic may crack at the opening. Match the material and print orientation to the number of installation cycles expected.
Print orientation and finishing
Before printing the STL, inspect it in Bambu Studio, Cura, PrusaSlicer or another slicer. Scale, bed contact, wall count and layer direction all influence the channels and snap entries. The strongest-looking orientation may not be the most durable if the retaining lips are loaded across weak layer lines.
Remove strings and small burrs from the channels carefully without cutting away the narrowed entries. Sharp edges can mark soft hoses or cable jackets. Snap every line into place by hand and check for visible compression before running the machine.
What this holder is not designed to do
- It is not a strain relief for mains or equipment cables.
- It does not mount the bundle to a wall or machine by itself.
- It does not seal pneumatic or liquid tubing.
- It does not guarantee a defined minimum bend radius.
- It is not a replacement for an energy chain on long, fast or safety-critical motion.
- It is not intended for a set of strongly different cable diameters.
These limits clarify the real strength of the design: keeping several similar round lines compact, organised and individually removable.
Download the STL or order the printed holder
Measure the thickest part of the line, select the actual channel count and choose a length that suits movement and available space.
Frequently asked questions
Can different cable diameters share one holder?
No. All radial channels use the same entered diameter. Create separate holders for lines that differ noticeably in size.
How many lines can the holder organise?
The model supports whole-number channel counts from 1 to 12. Its overall diameter is calculated automatically and grows as more channels are added.
Does it work as a four-PTFE-tube holder?
Yes. Four equal-size PTFE or Bowden tubes are a typical application. Measure their outside diameter, choose four channels and verify the movement of the complete bundle.
Can the holder be added after the tubes are connected?
Usually yes. Lines enter sideways through the snap openings, so fittings normally do not have to be removed. Test one sample first to confirm that the tube can be inserted without damage.
Can it be used with pneumatic tubing?
It can organise equal-size pneumatic tubes, but it performs no pressure-bearing, sealing or safety function. Follow the tube and fitting manufacturer's pressure and installation requirements.
How do I get the STL?
Enter the three parameters and check the generated model. You can then download the STL for your own printer or continue with the 3D-print ordering process.
Conclusion: only three inputs, but measure them properly
A radial snap holder is a compact way to organise several equal-size cables, PTFE tubes, Bowden tubes or pneumatic lines without permanently closing the bundle with a cable tie.
The useful design comes down to three values: actual outside diameter, required channel count and a holder length suited to the route. A test fit, suitable material and sensible placement then determine whether the bundle stays neat while remaining free to move.